File:Badge Marker.png
Jump to navigation
Jump to search
No higher resolution available.
Badge_Marker.png (600 × 250 pixels, file size: 15 KB, MIME type: image/png)
Guidelines for a good screenshot
Following these guidelines will help to maintain the look and format of the existing badge location images as future badges are added to the wiki.
- Crank up Ultra Mode as much as you can on your computer. Suggested levels include:
- Screen Resolution: 1680 x 1050 (or Windowed at 1680 x 994)
- FSAA: 4x
- Environment Reflections: High Quality
- Water Effects: High Quality
- Shadow Shader: High Quality
- Shadow Size: Medium
- Shadow Distance: Far
- Ambient Occlusion Strength: Strong
- Ambient Occlusion Resolution: Quality
- Ambient Occlusion Blur: Trilateral
- World Texture Quality: Very High
- World Detail: 200%
- Anisotropic Filtering: 4x
- Water Effects: High Quality
- Depth of Field Effects: Disabled
- Set "/visscale 4" to make as much of the background visible as possible. Note that the combination of this with ultra mode might degrade your system performance.
- Set "/screenshotui 0" to make sure the game UI doesn't show up.
- Press "B" or zoom the camera all the way in so your character is not visible. Turn off any powers that might be visible even when zoomed in, like defensive shields and bubbles.
- Make sure it is daytime in-game, being mindful of where shadows fall across the scene. Early morning and late evening are not preferred times because the colors and lighting will be off.
- Get above the marker location using a character with Hover, Fly, or even Rocket Board, and try to angle the camera so that you can see notable landmarks (i.e., Train Terminals, AE Buildings, statues) in the distance for reference. Screenshots angled straight down aren't very useful.
- This can take some practice to learn what constitutes a good balance of foreground and background elements. Depending on how far away you are in-game, you may have to take a second screenshot moved closer so you can see the actual marker location for reference in step 10.
- Open the screenshot in an image editing program and tweak the brightness and contrast if necessary. For example, Alt-Ctrl-Shift-L in Photoshop is auto-balance correction. This may have to be done manually, however, if the auto-correction produces strange and unnatural results.
- Scale the image down to 500 pixels wide, maintaining the image proportions.
- If using Photoshop, or a similar program, sharpen the image once. This will help the details "pop" after shrinking the image size.
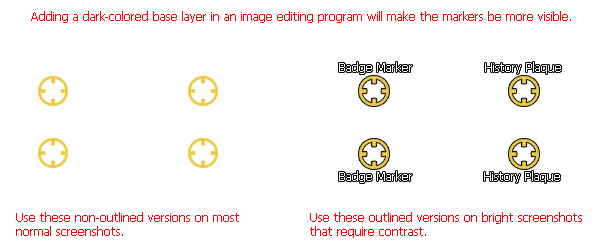
- Copy one of the badge or plaque markers from the template on this page into a new layer and center the crosshairs over the location of the exploration badge or history plaque.
- Depending on the composition of the image, it may be more appropriate to use one version versus the other of the crosshairs (with the text positioned over or under the reticle). If the background image is brightly lit, making the words of the template hard to read, use one of the outlined versions to make it more visible. As in step 6, this can take some practice to choose the best version of the crosshairs and text to use.
- Once you are satisfied with the image, flatten the layers and save as a JPEG file with medium-high quality. (In Photoshop, this would be 8 or 9.)
File history
Click on a date/time to view the file as it appeared at that time.
| Date/Time | Thumbnail | Dimensions | User | Comment | |
|---|---|---|---|---|---|
| current | 00:36, 8 May 2020 | 600 × 250 (15 KB) | Maintenance script (talk | contribs) |
You cannot overwrite this file.
File usage
There are no pages that use this file.