Pop Help: Difference between revisions
imported>Blondeshell mNo edit summary |
BlackSpectre (talk | contribs) No edit summary |
||
| (4 intermediate revisions by 2 users not shown) | |||
| Line 2: | Line 2: | ||
== Overview == | == Overview == | ||
[[Issue 18]] saw the inclusion of Pop Help. As your character performs certain actions or encounters certain situations, an exclamation mark will pop up on the right side of the screen. Clicking on the exclamation mark will bring up a tip window with helpful information. There is an option in the [[The Players' Guide to the Cities/User Interface/Options Window|options window]] to turn it off. | [[Issue 18]] saw the inclusion of Pop Help. As your character performs certain actions or encounters certain situations, an exclamation mark will pop up on the right side of the screen. Clicking on the exclamation mark will bring up a tip window with helpful information. The icon will disappear after the information has been displayed. You may have more than 5 pop help items available at any one time, but only 5 will display on the side of your screen at any one time. There is an option in the [[The Players' Guide to the Cities/User Interface/Options Window|options window]] to turn it off. | ||
Additionally, the invisible Pop Help window itself may be closed using the slash command {{slashcommand|window_hide|pophelp}}, and opened using {{slashcommand|window_show|pophelp}} (useful if the window is getting in the way of clicking powers or inspirations). | |||
== Issue 18 Pop Help Tips == | |||
=== Experience === | === Experience === | ||
As you defeat challenging foes and accomplish tasks, you will gain Experience (or XP). This causes the purple bar in the status window to grow, each time the bar hits maximum, it empties into one of the bubbles surrounding your character level. Once all ten bubbles are filled, you gain a Security Level and can train to earn new enhancement slots or powers. | As you defeat challenging foes and accomplish tasks, you will gain Experience (or XP). This causes the purple bar in the status window to grow, each time the bar hits maximum, it empties into one of the bubbles surrounding your character level. Once all ten bubbles are filled, you gain a Security Level and can train to earn new enhancement slots or powers. | ||
<br /> | <br /> | ||
| Line 66: | Line 18: | ||
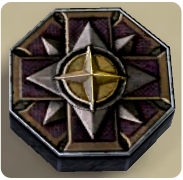
Look for Exploration Badges throughout the game. You can find them on the ground if you look closely. Finding new exploration badges earns you XP. Finding all the exploration badges in a zone while in Supergroup mode will earn a Teleport Beacon badge for that zone. | Look for Exploration Badges throughout the game. You can find them on the ground if you look closely. Finding new exploration badges earns you XP. Finding all the exploration badges in a zone while in Supergroup mode will earn a Teleport Beacon badge for that zone. | ||
<br /> | <br /> | ||
| Line 101: | Line 46: | ||
{{red|Attacking less often or using brawl more}}<br /> | {{red|Attacking less often or using brawl more}}<br /> | ||
Taking a break to let your bar recharge | Taking a break to let your bar recharge | ||
<br /> | |||
=== Experience Debt === | |||
You just paid off some XP Debt. When you are defeated, you incur {{teal|experience debt}}. While this debt remains, you must spend half your earned experience paying it off. The rest of your experience accumulates normally. Your debt will never exceed more than half the experience points required for your next security level. | |||
<br /> | <br /> | ||
| Line 111: | Line 61: | ||
<br /> | <br /> | ||
=== | === Enhancements === | ||
You | You just got your first Enhancement. | ||
Enhancements can make specific powers more accurate, do more damage, recharge faster, have more range, and even cost less endurance. | |||
Click {{green|Enhancements}} on the Powers Tray to see the enhancements you have. On that tab, click {{green|Manage}} to go to the enhancement management screen so you can slot enhancements into your powers. | |||
<br /> | <br /> | ||
=== Enhancements === | === Origin Enhancements === | ||
You just got your first Enhancement. | You just got your first Origin-Specific Enhancement. | ||
Enhancements | Origin-Specific Enhancements are more powerful than Training Enhancements, but they are specific to one or two origins. Origin-Specific Enhancements are typically called Dual Origin (DO) or Single Origin (SO) enhancements, depending on the type. | ||
You cannot use an Origin-Specific Enhancement from an origin other than your own. Origin-Specific Enhancements can be combined with other combinable enhancements, but the highest-level enhancement will determine the type of enhancement that results. | |||
<br /> | <br /> | ||
| Line 139: | Line 86: | ||
<br /> | <br /> | ||
=== | === Now Seeing Badges as a Hero/Villain === | ||
You just | Now that you're a hero/villain, your badge titles, text, and accolade powers may have changed. Heroes/Villains have a much different perspective on some deeds than villains/heroes. '''No badges or accolade powers have been removed.''' | ||
<br /> | |||
=== Hit Points === | |||
You've just taken some damage to your {{green|health}}. When you run out of health completely, you'll be knocked unconscious. Your current health is shown as a green bar in the top right of your screen. | |||
You constantly heal slowly over time. | |||
Colored numbers appear above the heads of you and your foes indicating healing or damage - and its source. | |||
'''Over the heads of others:'''<br /> | |||
{{orange|Orange}} damage done by you to the target<br /> | |||
{{green|Green}} healing done by you to the target<br /> | |||
{{gray|Gray}} damage/healing others did to them | |||
'''Over your head:'''<br /> | |||
{{red|Red}} damage to you<br /> | |||
{{green|Green}} healing to you | |||
<br /> | |||
=== Targeting Enemies === | |||
[[File:Tut_P_TargetingWindow.png]] | |||
When you target an enemy, that enemy's {{red|health}} appears as a red bar in your target tray. T toggles it open or closed. | |||
Use {{orange|Tab}} to select an enemy from a group of enemies, or {{orange|CTRL-Tab}} to select the nearest foe. | |||
To attack, {{red|click an attack power}} in the powers tray or the corresponding {{red|number key}} at the top of your keyboard. | |||
[[File:Tut_P_Tray_small.png]] | |||
<br /> | <br /> | ||
=== | === Zowies === | ||
You just | You have just received a mission to find zowies ({{red|Z}}one gl{{red|owies}}). Zowies are clickable objects that you can find in the zone. Press the M key or click the Map tab to see the position of the zowies you can collect to complete your task. | ||
You may see more zowies in the zone than you need to click to complete the mission, and that is OKAY! Time to get a-hunting. | |||
<br /> | <br /> | ||
| Line 156: | Line 132: | ||
You have account items or bonuses waiting for you to claim in your Global Mailbox. Click the {{green|Email}} button above the chat window and select the Character Items tab for items only claimable on a single character or the Account Items tab for items that all characters on your account are able to claim. | You have account items or bonuses waiting for you to claim in your Global Mailbox. Click the {{green|Email}} button above the chat window and select the Character Items tab for items only claimable on a single character or the Account Items tab for items that all characters on your account are able to claim. | ||
== Praetorian Tutorial Pop Help == | <br /> | ||
=== Finding Plaques === | |||
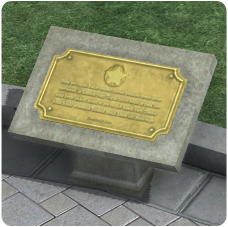
Through out the game you'll come across different Plaques. Clicking on a plaque will reveal background story about an area or character in the world. | |||
[[File:Tut P Plaque.png]] | |||
<br /> | |||
=== Powers === | |||
To use your powers, click the buttons in the powers tray. | |||
[[File:Tut_P_Tray_small.png]] | |||
You can also press the corresponding number at the top of your keyboard to use that power. | |||
<br /> | |||
== Praetorian Tutorial Pop Help Tips == | |||
=== Welcome to Praetoria === | === Welcome to Praetoria === | ||
This tutorial puts you on a path to become a loyal follower of {{darkorange|Emperor Cole}} or a subversive member of the {{blue|Resistance}}. | This tutorial puts you on a path to become a loyal follower of {{darkorange|Emperor Cole}} or a subversive member of the {{blue|Resistance}}. | ||
| Line 168: | Line 162: | ||
Click Hide to save this popup for later reading, or click Close to close it without saving it. | Click Hide to save this popup for later reading, or click Close to close it without saving it. | ||
=== Popup Help === | |||
[[File:Pop_Help_Icon_On_Alert_Glow.png]] | |||
The right hand side of the screen will display exclamation points as you go through the game. Click on them to learn more about the game. | |||
You can turn off the popup help by going to {{orange|Menu - Options}}, scrolling down to Prompts and disabling Pophelp. | |||
<br /> | |||
=== Status Window === | === Status Window === | ||
| Line 235: | Line 238: | ||
You | == Issue 21 Pop Help Tips == | ||
=== Clues === | |||
You've received a clue! | |||
Clues reveal more information on the current story you are on. | |||
Click on CLUES on your navigation bar to see what you found! | |||
<br /> | |||
=== Cellphones === | |||
You have the ability to call your contact up! | |||
Click on CONTACTS, then select CALL in order to speak with them. | |||
<br /> | |||
=== Elevators === | |||
You can use elevators to reach other levels within the map. Left click on the door to move yourself to the next level. | |||
== Freedom Tutorial Pop Help == | == Freedom Tutorial Pop Help Tips == | ||
=== Movement === | === Movement === | ||
| Line 253: | Line 272: | ||
and SPACEBAR to jump! | and SPACEBAR to jump! | ||
<br /> | |||
=== Compass Markers === | |||
Follow the compass marker to find a way out! | |||
<br /> | <br /> | ||
| Line 266: | Line 290: | ||
[[File:Tut_P_Tray.png]] | [[File:Tut_P_Tray.png]] | ||
<br /> | <br /> | ||
| Line 283: | Line 302: | ||
<br /> | <br /> | ||
=== | === Inspirations === | ||
You' | You're hurt! Left click on your inspiration tray to heal yourself. | ||
You can get inspiration by defeating enemies and also in stores within the world. | |||
<br /> | |||
=== NPC Interaction === | |||
Left click on an NPC to interact with it. | |||
[[File:NPopHelpTrainerHero.png]] | |||
[[File:NPopHelpTrainerVillain.png]] | |||
<br /> | |||
=== Moral Choice === | |||
You must choose your alignment! | |||
Are you a {{blue|Hero}} or a {{red|Villain}}? | |||
{{ | |||
{{ | |||
<br /> | <br /> | ||
=== | === Zone Events === | ||
You're entering a zone event. | |||
Players can work together to complete objectives in the event. | |||
[[File: | [[File:NPopHelpZoneEvent.png]] | ||
<br /> | <br /> | ||
=== | === Instanced Missions === | ||
You're now inside of an instanced mission. | |||
This is your own private mission, but you can invite other people to join you. | |||
The more players you have with you, the more enemies will show up! | |||
<br /> | <br /> | ||
=== | === Waypoints === | ||
You | Waypoints can help direct you towards your next destination. They may be behind or above your character. | ||
Move to your next waypoint now to look for the Blue Spectrum! | |||
[[File:NPopHelpWaypointMarkert.png]] | |||
== Issue 24 Pop Help Tip == | |||
=== Mission Allies === | |||
You have a special type of ally in this mission! | |||
This ally will not go away when they're defeated; instead, they will rest for some time, then get back up to full health. | |||
[[File:NPopHelpZoneEvent.png]] | [[File:NPopHelpZoneEvent.png]] | ||
[[Category:User Interface]] | |||
[[Category: | |||
Latest revision as of 08:07, 9 July 2022
Overview
Issue 18 saw the inclusion of Pop Help. As your character performs certain actions or encounters certain situations, an exclamation mark will pop up on the right side of the screen. Clicking on the exclamation mark will bring up a tip window with helpful information. The icon will disappear after the information has been displayed. You may have more than 5 pop help items available at any one time, but only 5 will display on the side of your screen at any one time. There is an option in the options window to turn it off.
Additionally, the invisible Pop Help window itself may be closed using the slash command /window_hide pophelp, and opened using /window_show pophelp (useful if the window is getting in the way of clicking powers or inspirations).
Issue 18 Pop Help Tips
Experience
As you defeat challenging foes and accomplish tasks, you will gain Experience (or XP). This causes the purple bar in the status window to grow, each time the bar hits maximum, it empties into one of the bubbles surrounding your character level. Once all ten bubbles are filled, you gain a Security Level and can train to earn new enhancement slots or powers.
Exploration Badges
You just found your first Exporation Badge.
Look for Exploration Badges throughout the game. You can find them on the ground if you look closely. Finding new exploration badges earns you XP. Finding all the exploration badges in a zone while in Supergroup mode will earn a Teleport Beacon badge for that zone.
Running out of Endurance
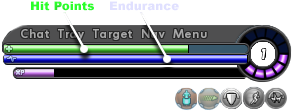
You just ran out of Endurance! The blue bar under your green health bar shows how much endurance you currently have. Using powers costs endurance, which recharges slowly over time. When you run out of endurance, you cannot use any powers that require endurance.
You can prevent running out of endurance in several ways:
Using blue inspirations
Slotting your powers with Endurance Reduction enhancements
Slotting your Stamina power with Endurance Modification
Attacking less often or using brawl more
Taking a break to let your bar recharge
Toggles Dropping
One of your toggles just turned off because you don't have enough Endurance!
Using toggles costs endurance, which recharges slowly over time. When you run out of endurance, all endurance-using toggle powers are turned off!
You can prevent running out of endurance in several ways:
Using blue inspirations
Slotting your toggle power with Endurance Reduction enhancements
Slotting your Stamina power with Endurance Modification
Attacking less often or using brawl more
Taking a break to let your bar recharge
Experience Debt
You just paid off some XP Debt. When you are defeated, you incur experience debt. While this debt remains, you must spend half your earned experience paying it off. The rest of your experience accumulates normally. Your debt will never exceed more than half the experience points required for your next security level.
Patrol Experience
When you log off, you accrue patrol experience. While that character is logged off, more is gained to a maximum of 10 bubbles. Patrol experience is shown as a light blue extension off the end of the experience bar.
Patrol experience is a 50% bonus to your experience for enemy defeats. This means that while credit remains, any XP earned by a character due to creature defeats is multiplied by 150% (this does not stack with other experience bonuses). That extra XP is then subtracted from your accrued patrol experience.
Enhancements
You just got your first Enhancement.
Enhancements can make specific powers more accurate, do more damage, recharge faster, have more range, and even cost less endurance.
Click Enhancements on the Powers Tray to see the enhancements you have. On that tab, click Manage to go to the enhancement management screen so you can slot enhancements into your powers.
Origin Enhancements
You just got your first Origin-Specific Enhancement.
Origin-Specific Enhancements are more powerful than Training Enhancements, but they are specific to one or two origins. Origin-Specific Enhancements are typically called Dual Origin (DO) or Single Origin (SO) enhancements, depending on the type.
You cannot use an Origin-Specific Enhancement from an origin other than your own. Origin-Specific Enhancements can be combined with other combinable enhancements, but the highest-level enhancement will determine the type of enhancement that results.
Fading Enhancements
An enhancement that you slotted has become useless because you have outleveled it by four levels. The level number on the enhancement has turned red to indicate you cannot use it. You can replace it with a new enhancement that is not faded.
Now Seeing Badges as a Hero/Villain
Now that you're a hero/villain, your badge titles, text, and accolade powers may have changed. Heroes/Villains have a much different perspective on some deeds than villains/heroes. No badges or accolade powers have been removed.
Hit Points
You've just taken some damage to your health. When you run out of health completely, you'll be knocked unconscious. Your current health is shown as a green bar in the top right of your screen.
You constantly heal slowly over time.
Colored numbers appear above the heads of you and your foes indicating healing or damage - and its source.
Over the heads of others:
Orange damage done by you to the target
Green healing done by you to the target
Gray damage/healing others did to them
Over your head:
Red damage to you
Green healing to you
Targeting Enemies
When you target an enemy, that enemy's health appears as a red bar in your target tray. T toggles it open or closed.
Use Tab to select an enemy from a group of enemies, or CTRL-Tab to select the nearest foe.
To attack, click an attack power in the powers tray or the corresponding number key at the top of your keyboard.
Zowies
You have just received a mission to find zowies (Zone glowies). Zowies are clickable objects that you can find in the zone. Press the M key or click the Map tab to see the position of the zowies you can collect to complete your task.
You may see more zowies in the zone than you need to click to complete the mission, and that is OKAY! Time to get a-hunting.
Account Items
You have account items or bonuses waiting for you to claim in your Global Mailbox. Click the Email button above the chat window and select the Character Items tab for items only claimable on a single character or the Account Items tab for items that all characters on your account are able to claim.
Finding Plaques
Through out the game you'll come across different Plaques. Clicking on a plaque will reveal background story about an area or character in the world.
Powers
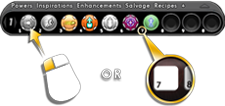
To use your powers, click the buttons in the powers tray.
You can also press the corresponding number at the top of your keyboard to use that power.
Praetorian Tutorial Pop Help Tips
Welcome to Praetoria
This tutorial puts you on a path to become a loyal follower of Emperor Cole or a subversive member of the Resistance.
To get started, walk up to Officer Flint and click on him.
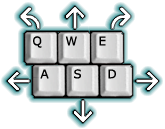
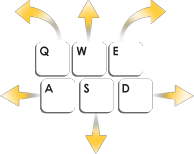
Use W, A, S, & D to move and Q & E to turn as shown here.
Click Hide to save this popup for later reading, or click Close to close it without saving it.
Popup Help
The right hand side of the screen will display exclamation points as you go through the game. Click on them to learn more about the game.
You can turn off the popup help by going to Menu - Options, scrolling down to Prompts and disabling Pophelp.
Status Window
The Status Window displays your current health, endurance and experience.
Below the Status Window are the various buffs or debuffs your character currently has applied to them.
The text buttons at the top of your status window will open or close your other windows.
Sprinting
Sprint is a power that every character gets for free, it lets you run faster at a slight endurance cost. Sprint is a toggle power: using it turns on the power, and using it again will turn it off.
Click on the Sprint icon now to move faster.
You can also use the R key to automatically run until you use another movement key to cancel.
Mission Doors
When you reach your mission door, left click on it to enter the mission.
NPC Dialog
At certain points in missions, other characters will ask you to speak to them - you won't be able to attack them while they are in this mode.
To talk to them, move close to that character and click on them to start a conversation. What happens afterwards is your choice!
Mouse Look
By holding down the right mouse button, you can move the mouse to look around or turn.
You can change mouse settings by clicking Menu (top right corner of the screen) and choosing:
Options - Controls - Mouse
You can also map various mouse settings under Menu - Options - Keymapping - View.
The Options window will also let you change graphics setting, controls, your user interface, and other options.
Yellow Reticles
Enemies with a YELLOW reticle around them will only attack you if you attack them first.
You will encounter these enemies all throughout Praetoria.
Jumping
You can jump by pressing the space bar.
The longer you hold down the space bar, the higher you will jump. You should be able to easily jump up onto this broken train.
Getting Help
The help window can be opened by hitting the H key. You can access the help window by selecting Menu - Help
Also, if you're stuck you can type /help into the Chat Window.
Issue 21 Pop Help Tips
Clues
You've received a clue!
Clues reveal more information on the current story you are on.
Click on CLUES on your navigation bar to see what you found!
Cellphones
You have the ability to call your contact up!
Click on CONTACTS, then select CALL in order to speak with them.
Elevators
You can use elevators to reach other levels within the map. Left click on the door to move yourself to the next level.
Freedom Tutorial Pop Help Tips
Movement
Get out of Galaxy City!
Use the W, A, S, & D keys to move
and SPACEBAR to jump!
Compass Markers
Follow the compass marker to find a way out!
Targeting Enemies
When you target an enemy, that enemy's health appears as a red bar in your target tray. T toggles it open or closed.
Use Tab to select an enemy from a group of enemies, or CTRL-Tab to select the nearest foe.
To attack, click an attack power in the powers tray or the corresponding number key at the top of your keyboard.
Combat
Defeat the Shivans by left clicking on the powers in your power tray!
You can also activate your power using the number beside it!
Inspirations
You're hurt! Left click on your inspiration tray to heal yourself.
You can get inspiration by defeating enemies and also in stores within the world.
NPC Interaction
Left click on an NPC to interact with it.
Moral Choice
You must choose your alignment!
Are you a Hero or a Villain?
Zone Events
You're entering a zone event.
Players can work together to complete objectives in the event.
Instanced Missions
You're now inside of an instanced mission.
This is your own private mission, but you can invite other people to join you.
The more players you have with you, the more enemies will show up!
Waypoints
Waypoints can help direct you towards your next destination. They may be behind or above your character.
Move to your next waypoint now to look for the Blue Spectrum!
Issue 24 Pop Help Tip
Mission Allies
You have a special type of ally in this mission!
This ally will not go away when they're defeated; instead, they will rest for some time, then get back up to full health.
