Goto tray (Slash Command): Difference between revisions
Jump to navigation
Jump to search
BlackSpectre (talk | contribs) No edit summary |
BlackSpectre (talk | contribs) No edit summary |
||
| (2 intermediate revisions by the same user not shown) | |||
| Line 1: | Line 1: | ||
== Slash Command == | == Slash Command == | ||
[[File:COHPowerTrays3.png|thumb|right|400px|Tray Window]] | |||
{{SlashCommandArticle|command=goto_tray|options=number|note=Go to specified power tray number in the primary tray slot. | {{SlashCommandArticle|command=goto_tray|options=number|note=Go to specified power tray number in the primary tray slot. | ||
* There is only one Tray '''window''' (also known as the "Powers" or "Power" window). | * There is only one Tray '''window''' (also known as the "Powers" or "Power" window). | ||
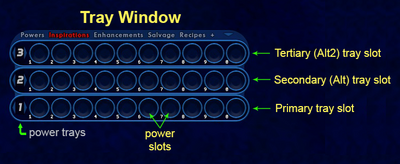
* Within the Tray window are 3 rows that hold power trays. The first and bottom row is called the primary Tray (or just "Tray"). The second row from the bottom is the secondary tray (or "Alt tray"), and the third is the tertiary tray (or "Alt2 tray"). | * Within the Tray window are 3 rows that hold power trays. The first and bottom row is called the primary Tray (or just "Tray"). The second row from the bottom is the secondary tray (or "Alt tray"), and the third is the tertiary tray (or "Alt2 tray"). | ||
* Clicking the tiny down arrow in the upper right corner of the Tray window will cycle through showing or hiding the Alt and Alt2 trays. | * Clicking the tiny down arrow in the upper right corner of the Tray window will cycle through showing or hiding the Alt and Alt2 trays. | ||
* Each | * Each Tray Slot row can cycle through all 9 power trays. | ||
* The picture above shows power tray #1 in the primary Tray, power tray #2 in the Alt tray, and power tray #3 in the Alt2 tray. | * The picture above shows power tray #1 in the primary Tray, power tray #2 in the Alt tray, and power tray #3 in the Alt2 tray. | ||
* Keep in mind that the tray slot window numbers are invisible, but they do have numbers. | * Keep in mind that the additional (+) floating tray slot window numbers are invisible, but they do have numbers. Tray1 = first floating tray, tray 2 = second floating tray, tray3 = third floating tray, and so on. This is useful to remember in case you want to use the window show and hide commands with the tray slots. For example, <code>/window_show tray3</code>. | ||
Latest revision as of 22:47, 22 February 2024
Slash Command
/goto_tray number
Go to specified power tray number in the primary tray slot.
- There is only one Tray window (also known as the "Powers" or "Power" window).
- Within the Tray window are 3 rows that hold power trays. The first and bottom row is called the primary Tray (or just "Tray"). The second row from the bottom is the secondary tray (or "Alt tray"), and the third is the tertiary tray (or "Alt2 tray").
- Clicking the tiny down arrow in the upper right corner of the Tray window will cycle through showing or hiding the Alt and Alt2 trays.
- Each Tray Slot row can cycle through all 9 power trays.
- The picture above shows power tray #1 in the primary Tray, power tray #2 in the Alt tray, and power tray #3 in the Alt2 tray.
- Keep in mind that the additional (+) floating tray slot window numbers are invisible, but they do have numbers. Tray1 = first floating tray, tray 2 = second floating tray, tray3 = third floating tray, and so on. This is useful to remember in case you want to use the window show and hide commands with the tray slots. For example,
/window_show tray3.
Example
/goto_tray 4
