Base Editing
This article is a Player Guide. The Homecoming Wiki takes no responsibility for the content within.
Questions and concerns should be posed to the authors of the article using the article's talk page.
Overview
This page provides a guide to using the edit functions of a supergroup base.
Base Editing Selector
The Base editing selector is available in the Entrance Room. When you leave the entrance room, the Base Editing selector is removed (allowing you an unobstructed view of the base). Once you have selected a function of the base editing selector, you may move about the base as desired. While in Base Editting Mode, you can walk through placed objects (such as desks, tables), and your viewpoint may pass through walls to give you a better view of the base.
There are several separate functions available on the Base Editing Selector:
- Requires base editing supergroup privileges.
- Used to buy/move/delete items and rooms. Also used to modify lighting, floor and ceiling height and styles.
- Requires base editing supergroup privileges.
- Used to build larger plot sizes or move/rotate the current plot around in relation to the whole base.
While in Base Editing mode, you can still use keybinds, which can be used to bring up the chat window so you can keep a discussion going while editing. (If you use the default keybinds, this can be achieved simply by pressing enter.)
Upgrade Plot
This option is available to anyone with base editing privileges.
This function permits the editor to change the Base Plot, the area within which rooms can be placed.
- See: Base Plots
A floating box displays the current plot information, and an Item Selection Bar at the bottom lists the base plot choices available. Note that one can also re-position the entire plot (if room allows) by purchasing the same plot one already owns, and positioning it differently.
Edit Base
This option is available to anyone with base editing privileges. Selecting this option brings up the three main elements of the base editor:
- the Room Overview window,
- the Attribute Editor,
- and the Item Selection Bar.
The Item Selection bar appears at the bottom of the screen, and provides several editing modes:
- This mode permits you to add and remove rooms from the plot, to move existing rooms, and to alter the ceiling and floor levels of individual rooms.
- This mode permits you to select segments of a room and choose styles for it. These include both selecting the pattern for a given segment of the room, and the colors of that segment.
- This mode permits you to place, move, and remove normal items from the plot.
In addition to these choices, the Item Selection bar also displays a selection of items, dependent upon the current editing mode (rooms, style, items).
Room Overview
The room overview starts at the top with a description of the selected room.
Using the arrows (on either side of the room description) will change currently selected room and move you to the room in question.
At the bottom of the panel are buttons that allow you to Move or Delete the room, or to apply the current room's style to the base at a whole.
- See Also: Room Parts
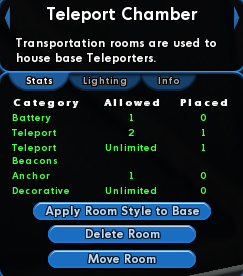
Stats
Displays
- what categories of item can be placed in this room
- how many items of that category are allowed
- how many have been placed.
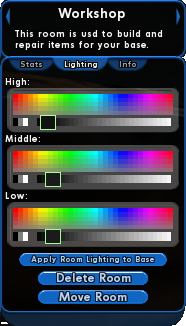
Lighting
Provides a control allowing you to change the ambient lighting color and strength of a whole room. A handy button allows you to copy the lighting for the current room to the entire base.
This sets how items in the base, and the base walls, are lit at the three elevations. Note that light at one level will spill over into the other levels. Setting colors that look good may be something of an art.
- You can change the light in an area locally by adding lighting items with the Place Items option.
- See Also: Room Parts
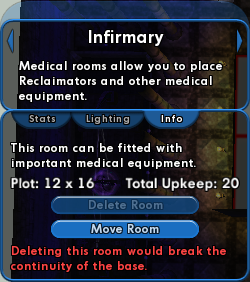
Info
The Info tab shows the size of the base's plot. It also provides an additional description of the room type, although on Homecoming, most items can be placed in any room.
Apply Room Style to Base
This button takes all elements of the current room's style elements and applies them to the entire base. See Pick Style for more information.
Apply Room Lighting to Base
As described above, this button simply takes the current lighting settings, and applies them to each room of the base. See Lighting, above.
Attribute Editor
The Attribute Editor displays different things in different modes:
- When creating rooms, it allows editing of the ceiling and floor heights, and the distribution of those settings.
- When picking styles, it allows editing of the primary and secondary colors of the selected item.
- When placing items, it describes the attributes of the current item.
Room Height Selection
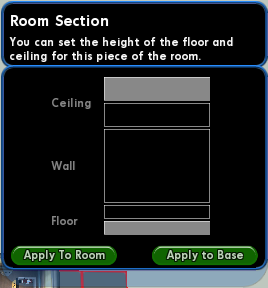
The Attribute Editor displays the Room Height selector any time you have a floor square selected. The selector displays a diagram of the various room heights, showing 2 ceiling elevation choices and 2 floor choices. Also, a 'wall' choice is available.
- See Also: Room Parts
Click on the boxs in the diagram to alter the height. A diagram of all empty boxes indicates low floor height, and high ceiling height. Filling in the two bottom boxes yields medium and high floors. The two top boxes create medium and low ceilings.
One may also choose to fill in the area completely, creating a wall, by selecting the middle field. This allows you customize the shape of the room by filling in a grid square. Note that you will not be permitted to create walls that disrupt flow through the base (in other words the exit must remain accessible).
Restrictions do apply. When objects exist in the room square selected, the ceilings/floors may not be set to cover them up. Not verified.
Selecting the room height in this fashion changes it only for the one square selected. The buttons Apply to Room and Apply to Base apply these settings to the entire room, and to all squares used in the base, respectively, except where an existing object blocks the change (such as an object on the wall that would impeded the raising of the floor or lowering of the ceiling, or an object resting on a floor or placed on a ceiling).
Style Editing
When you are in Style Editing mode and have a style element selected (a section of wall, floor, ceiling, or trim), the Attribute Editor provides you options for changing the primary and secondary colors of the element you have selected.
Object Editing
When you are in Item Editing or Style Editing mode and have an item selected, the Attribute Editor will display:
- Object: a thumbnail image of the selected item rotates in this view, along with the Energy and Control the object produces or consumes (if any). If the object already exists in the base, This tab also allows you to sell the object.
- Info: flavor text describing the object. Also vital statistics.
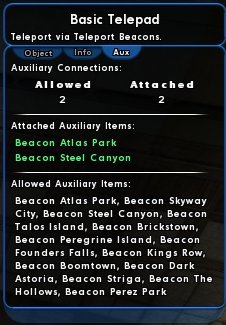
- Aux: if the object allows auxiliary connections, this tab allows you to see
- how many connections are allowed, and how many of those are in use.
- what auxiliary items are attached.
- what auxiliary items are allowed.
Creating Rooms
The room selected in the Room Overview will be the Entrance Room. Your view will be zoomed out (to make placing rooms more convenient), but you can change your camera view as normal. You should be able to view the entire base from this overhead view.
The Item Selection Bar shows a list of room categories to choose from, and the types of rooms available in that category.
Placing a room
You place a room by selecting it from the selection bar, and moving your cursor around on the plot. You can rotate the room by right-clicking, and any time your cursor is over a valid location (the placement ghost turns from red to blue) you can place it by left-clicking.
A location is valid if:
- the room does not overlap or touch the sides or corners of other rooms;
- the room does not hang over the side of the plot
Rooms cannot be in directly adjacent squares, they must have a door (1x1 square) separating them.
Doorway Placement
Doors may be placed anywhere in the single space between two rooms. Doors may not span more than one space. Doors may not be added to the corners of rooms. These are "dead zones" for item placement. An item must be at least partially in a door or a room to be placed, and so, no items may be anchored in a space with neither a door nor a room.
Moving a room
You move a room by having that room selected (in the Room Overview) and pressing "Move Room". You may move a room that has items in it. If you rotate the room, the items in it are rotated as well.
You cannot move a room that contains storage items.
Rooms may become impossible to turn or move if they contain a certain number of items (threshold as yet undetermined), or too many items are clipped through the floors and walls.
Creating a Doorway
Doorways are special:
- You cannot set styles for them. They will take on the styles of the rooms on either side (half of each, meeting half-way through the door).
- You can adjust the ceiling and floor heights independently, but cannot fill the "wall" section (to effectively block the door).
- If you put doors between rooms and then fill a section of a room and apply it to the base, all of the doors on the map will seem to disappear. You won't be able to place items over them, just as if they were not there, but if you try to place a door where the space is, it will show you that you can't place a door there, because one is actually there already. To be able to place items over that space, you must clear the fill of the base, remove the doors, and then you can fill the base again. now add the doors back. Note that these will now appear on the map.
- Special trick to allow creative item placement: Doors are considered as being half of one room, and half the other, as indicated by the different styling choices possible when two adjoining rooms are two different styles. The computer allows item placement in doors, but assigns the object to one room or the other, depending on which half of the door the piece is on (determined by where the "grab point" of the item is located). This allows you to place an object outside of the boundaries of a room,in the doorway between two rooms. If you then delete the room on the far side of the placed object, as long as your object is technically in the half of the doorway of the room that is still there, the object should stay.
Picking Styles
- See Also: Room Parts, Base Room Styles
In this mode, the Item Selection Bar give you choices for textures for each portion of a room:
- Floors: Low, Medium, and High
- Ceilings: Low, Medium, and High
- Walls: Medium, High, and Very High.
- Also, Floor Walls, and Ceiling Walls
You are able to select multiple floor and ceiling styles, because you can have multiple floor and ceiling heights within the same room.
The Attribute Editor shows you the primary and secondary color selections for whichever room item you have currently selected. Note that the item color is separate from the room lighting (shown in the lighting tab of the Room Overview), and can enhance effects of the room style.
While you can edit the room height on a tile by tile basis, you can only change styles for the room as a whole. Each room can have an entirely separate set of styles, or the style selections can be used for the base as a whole.
Floor and Ceiling Walls
Floor walls are the vertical surfaces seen between different levels of floor. They can only be seen when more than one level of floor exists within a room. More than that, Floor Trim normally covers floor walls for one level.
To see floor walls, you must either have a 2-level difference in floor level, or have an object placed against the wall (which will suppress the Floor Trim element).
Ceiling Walls function in the same way as floor walls.
Ceiling or floor trim may be eliminated in your style choices.
Placing Items
Placing items in a base is mostly a straightforward process.
To place a new item in the base, select it from the Item Selection Bar at the bottom of the screen. A copy of that item will appear centered on your cursor, with a placement box around it to display the area needed to place it. The placement box is pale blue if the item can be placed at the current location, red otherwise.
The item placement box will appear at the nearest appropriate surface closest to the cursor. Each item is placed on only one type of surface: the Floor, a Wall, Ceiling, or Surface. The type of surface depends solely upon the item. You may change the attachment of the item by clicking <F5>.
Additionally, some items (desks, tables) will permit other (small) items to be placed on top of them. For example, the rustic desk permits the Small LCD to be placed upon it. In other words, there are some items that function as floors, which may affect how an item cued to attach to a floor moves as you port it across a space.
Items initially appear in the placement box in a particular orientation. They may be rotated, 90 degrees at a time, by right-clicking. An item will not rotate if there is not room to put it at that location in that orientation unless you enable clipping by pressing <F3>
Pressing the <ESC> key aborts placing a new item, or lets go of an item you have grabbed and keeps it as it was.
Item selection
- In Pick Item mode, the Item Selection Bar lists items by categories. The categories are currently disorganized, so you may find things in one category that you would have thought would have been in another category, so look through the editor frequently to become familiar with the items.
- In Current Room mode, the Item Selection Bar lists those items that are currently in the room. (A convenience for hard-to-select items.)
- There is no longer a Place Personal Items mode. Instead, what used to be Place Personal Items mode can be accessed by the /command /editbase 2 which will let you enter a view only edit mode of sorts. You can move through the base like an editor, and see the names of placed items, but you cannot actually affect anything. You do not have to have editing permissions to use this, you only need to be a member of a sg.
Moving items
When selected, a blue bounding box will appear around an item. The item can then be dragged to a new location, but the behavior of the dragging and dropping is not smooth--the item will sometimes shift just as it is picked up. This is because you will "grab" the item by its grab point, and the location of this varies. It's usually in the center of the item. The bounding box will appear red when the item overlaps a wall or another item too closely, unless you enable clipping with <F3>. Dropping the item when the bounding box is red will result in the item appearing in the last valid location, or the nearest valid location. If you enable clipping, you can place the item anywhere if the grab point is within the vertical bounds of a room or doorway.
Clicking with the right mouse button (even while still dragging) rotates the item 90 degrees.
Related main and aux items: This only now applies to teleporters, so main items are the portal, and the aux items are the beacon.'When dragging or placing a beacon item, the red bounding box appears until it is proximate to an appropriate portal item. If a portal item is dragged too far from its currently-attached beacon item(s) (or vice versa), the attachment can be broken. Dragging the beacon item back to its portal item will re-attach it. When dragging an beacon item near an appropriate portal item, the portal item shows a yellow bounding box to indicate the proposed attachment between the two. Dropping the beacon item when a portal item is showing a yellow bounding box will attach (or re-attach) the item. If, when dragging an beacon item near an appropriate portal item, the bounding box stays red, it indicates that the portal item already has the maximum allowed attachments. You can check how many attachments a teleporter portal has under the auxiliary tab.
Camera Angle
As when playing the game, holding down the right mouse button while moving the mouse will change the camera angle. Side-to-side movements will also rotate the character. This is especially helpful when placing or dragging items on the ceiling. It's also the reason why floors, ceilings and walls are solid only on one side (so you can see up through the floors when placing ceiling items, or down through the ceiling when placing floor items, or see into a room from outside its walls).
The "home" and "end" keys adjust the camera distance from the character.
The "PgUp" key resets all camera angle and distance (although not consistently).
Camera angle is important in base editing. Your view determines which available surface an item will attach to. Item placement is determined from a triangulation of camera angle, the mouse location, and that attachment orientation. So, if you are looking so that the camera is pointing across the base, if you let an item go, the item will attach at the nexus where that camera intersects with a surface it can attach to in line with the mouse. This can often be across the base, so be mindful of your camera angle, and having the camera looking straight down helps eliminate odd placements. Be sure to check placements from multiple angles to make sure it's correct.
Here's an example of moving "down" the camera angle until the ceiling is clearly visible. Ceiling items are most easily placed using this angle.
Advanced Tricks
Temporary space for moving rooms around
If you have a tightly-packed plot and rooms with lots of items in them, you can upgrade to a larger plot and use the extra space to rearrange rooms, then "upgrade" the plot size again, back to the original (smaller) size. The key piece of information here is that "upgrading" your plot can actually be used to "downgrade" it as well, so you can temporarily upgrade to make more room for base editing.
Also, you can shift your entire set of rooms a few blocks (assuming you have an empty row or column to allow for it) by purchasing the same size plot you already have, but "dropping" it into a different position.
Stacking
Certain objects stack easily on top of each other, and other object stack on each other sideways (such as when attached to a wall). This allows you to build up from the floor, and to build out from the wall, effectively suspending things in mid-air. For objects that normally tack onto walls, you can stack something out from a nearby wall, or even temporarily "brick" one of the room grids (click on "fill" within the "wall" section of the height adjustment for a selected grid square within the room), and then build out from there.
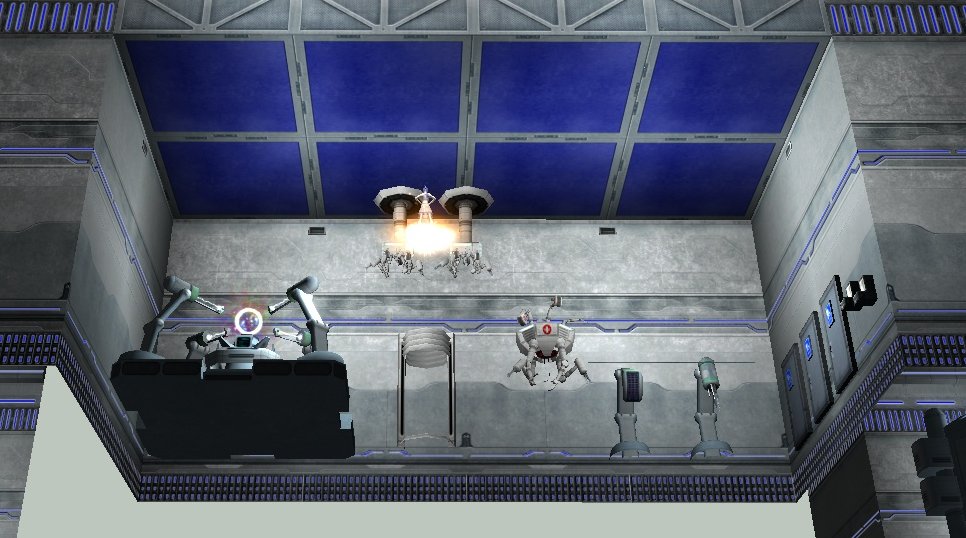
One good object to use for stacking out from walls is the "small shoji wall lamp", which appears almost at the end of the "lighting" tab of objects within the objects window. Telepad beacons, for instance, can be placed in mid-air by placing them onto a string of shoji lamps coming from a nearby wall. This is how people make the telepad beacons appear to be attached to the legs of the telepad. One has to move the telepad out of the way, place the string of shoji lamps, then move the telepad back into place, and place the beacon, so that you can align it as you want. When doing this, the telepad beacon is attached to the telepad (as per the "main" to "aux" relationship), but is actually positioned by being tacked to a shoji lamp. Once all the telepads and beacons are in place, the telepads can be temporarily moved out of the way in order to delete the shoji lamps. You can also delete them using the "current room" button within the object window--but this can easily result in accidentally deleting telepads, beacons, or other objects unintentionally, since there is some lag between deleting an object and the selection of another object in the object window. It's safer to move the telepads out of the way, then delete the lamps by clicking with your mouse and hitting the "delete" key (synonymous with the "sell" button, by the way).
Stacking from the floor up can be done with several types of counters and desks within the "desks" tab, and with the "floor safe" within the "room details". Floor safes happen to be about the same height as the difference between "low floor" and "mid floor" heights, which is also the same height as the distance between "mid floor" and "high floor". Because of this, floor safes are a good candidate to stack sections of ramps so that the top of one ramp connects to the bottom of the next ramp.
When making "pseudo-multi-level" rooms, the "floor safe" can be stacked up in order to position "floor tiles" at the appropriate height(s). This by itself is inadequate, since floor tiles are invisible from below. To make a solid ceiling when viewed from below, position a plane of something like "white cabinet", overlapping them to look like a continuous smooth surface. Once all the cabinets are in place, the floor safes below can be removed, and the "second story" will remain suspended in mid-air.
One note about peculiar behavior of the base editor re/ floor safes: position the floor safe atop an existing object BEFORE attempting to rotate it. If you rotate it first, it seems more reluctant to stack.
Here's an example of teleporter beacons placed using shoji lamps.
Labeling with Banners
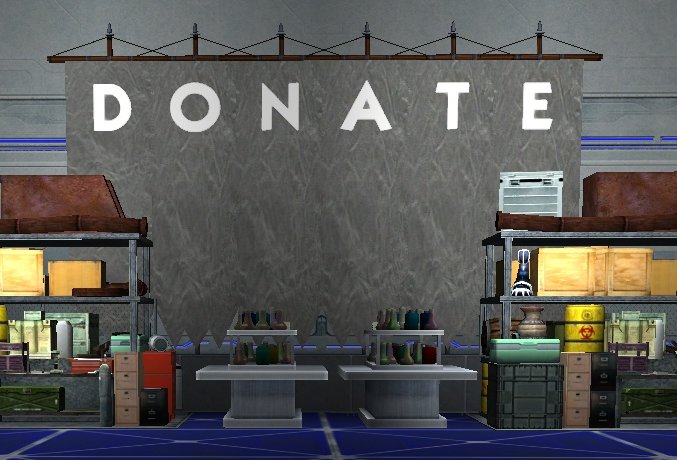
This section describes how to create labels for things throughout your base using the banners (labeled as "stands") within the "room details" tab of the objects. When you drop a banner (while dragging or placing), it changes to the supergroup icon and colors that are currently in effect, and it will not change even if you later change your supergroup colors and icon (unless the banner is moved--see warnings below). You can use this to your advantage in order to label areas of your base, such as what levels of enhancements are in an enhancement table, or who's "private workshop" one is looking at the entrance of (for those Supergroups run more like "super roommates").
This is a tedious process, but at this point it's your only option. It also takes advantage of what might be considered a bug that might be fixed in the future.
Count how many unique letters, numbers, and symbols (you can use the lightning bolt icon as a slash, for instance) you plan to use. If there are 24 or fewer unique icons in your label, then proceed. "Unique" means that you count each letter which appears in your label, no matter how often it appears. "REAR AREA" for instance has 3 unique characters: A, R and E. If you need more than 24, then you do not have enough banner types to make this work. Note that if you are already using a banner elsewhere in your base that you do not want to change, then note which banners are used, and do not use them as part of your labeling project.
Change your supergroup colors to white and white, and change your supergroup icon to the first letter, symbol or number to be placed. Drop "small arcane stand 1" at the leftmost position of where you want your label. Make note of which banner type is used for which letter. When you drop the first banner, you'll notice that using white-on-white has given the banner an overall gray texture without the design that would otherwise appear, with an easy-to-read letter, number or symbol. You'll need to keep notes about which banner type ("small arcane banner 1" through "small arcane stand 12" and "small tech stand 1" through "small tech stand 12") is used for each letter, number or symbol. For each new icon, de-select the current banner (IMPORTANT! and frustrating if you forget), change your supergroup icon, and then place the next banner. If you are using a letter, number or symbol that has already been used, you will still have to change your supergroup icon before placing another copy. So when doing this, always change your supergroup icon first, then place a banner, position it correctly, and repeat.
If you move any existing banner, it will change to your current icon and colors, as will every other banner of the same type throughout your base. To correct this, change your supergroup icon and colors, move the offending banner somewhere and move it back (or delete it and replace one of the appropriate type). The best way to avoid problems is to change the supergroup icon and colors before even being tempted to move a banner.
If you leave the base and return, any banners that have been placed in the base will show the "placed" colors and icons in the object selection window. This helps you determine what has already been used and can be reused when you are working on another label in the future. While you are actively labeling something, it's helpful to keep a list of which banners are assigned to which letter, number or symbol. When you are completely done labeling, don't forget to change your supergroup colors and icon back to whatever you normally use. And remember that moving any of these banners will change it to the current icon and colors, and you'll have to fix it by temporarily changing your supergroup icon and colors, moving the banner around, and changing your icon and colors back.
Here is an example of public salvage racks and enhancement tables in one supergroup base where players donate anything they don't need to other members.
Related Player Guides
These guides are linked here as a suggested reference material, and like all guides, are the responsibility of their posters to be accurate.
External Links
