Demo Editing/Understanding Demo Code
Overview
Demo code refers to the various commands, associated variables, and other data found in a demo file. It is this code which instructs the game engine how to play back and display the session (or created content) captured by the Demo Recording. Modifying, deleting, or adding to this code is what constitutes the process of Demo Editing.
Please note that whether some particular demo codes and commands function during demo playback may change as the game version is updated.
Time Increment
The Time Increment is the information that tells the demo how to advance the play of the recording. Each line of demo code begins with a number that tells the game engine how much time to advance the demo playback since the previous line, hence this number is referred to as the Time Increment (among other terms). Looked at as a whole, rather than line by line, a demo file is formatted in such a way that it is organized into columns. The first column is always the Time Increment.
The Time Increment is always a positive integer value and specifies the time in milliseconds (thousandths of a second) that the game engine waits, after the previous line of demo code, before executing the next line. So a value of 2000 at the beginning of a line of demo code would mean that the 2 seconds of "real" time would pass, after the previous line of code, before the demo playback carries out the command on that line. The following code sample shows a line from a demo file with a Time Increment of 400 milliseconds (four-tenths of a second):
400 SKYFILE SKY 0 1 0.000000
Please note that this value, while it controls the advancement of the demo playback, does not control the time of day in a demo. The time of day in a demo is fixed by the Time command, and, once specified, remains fixed throughout the demo playback and does not change.
The Time Increment is required for every line in a demo, and must begin each line, even if the Time Increment is just zero.
The SKY command is frequently used for lines of demo code that serve no purpose other than to advance the Time Increment.
Entity ID
After the Time Increment, most lines of demo code will have a second positive integer value. A few special cases will instead have a text value after the Time Increment. This second number (or text entry) is the Entity ID. This value is the unique ID associated with every entity recorded in the demo. Entity refers to any model, object, mission objective, NPC, or player character in the demo. Each such element must have a unique ID associated with it, as specified by the Entity ID. All lines of code must have an Entity ID as the second element in the line, usually a positive integer. The special cases for the Entity ID are discussed below. As an example, the following line of demo code has an Entity ID of "3":
0 3 NEW "Senator Decimus Aquila"
Looked at in terms of a column format, the second column in a demo file is the Entity ID.
The Entity ID is a unique value associated with a specific entity. The Entity ID of each line tells the game engine which entity to apply/attach that line of demo code to. For example, if a line of demo code includes an animation (MOV), the Entity ID Number tells the game engine which entity to have perform that animation in the demo playback. The following line of demo code shows the WALKCYCLE MOV attached to the entity with the ID "113":
0 113 MOV WALKCYCLE 0
Special Case Entity IDs
- 0: "0" (zero) is used as the entity ID value for the Version, Map, Base, and Time commands. This is likely used as a "null" value of the Entity ID to indicate that these commands are not associated with a particular entity.
- CAM: The camera information recorded in the demo is identified by the text CAM in the place of the Entity ID number. This can be viewed as a special case value of the Entity ID where it uses the text CAM in place of a number.
- SKYFILE: Similar to CAM, the SKYFILE code appears in demo lines in the place normally associated with the Entity ID. This can also be considered a special case value of the Entity ID, specific to the SKY command which always follows.
- DYNGROUPS: As with CAM and SKYFILE, the DYNGROUPS code can be viewed as a special case non-numeric Entity ID associated specifically with the DYNARRAY command.
Version
The Version command line appears to be a standard and constant introductory line used to designate the start of the demo file. This command line takes the form of:
1 0 Version 2
Altering the variable following the Version command can cause the demo to crash. Altering this command line is not recommended.
Note that the Version command line always begins with a Time Increment of 1 (rather than 0).
Map
The Map command tells the game engine what map to display for the demo playback. The Map command will be followed on the same line by the file name of the map to be displayed, like so:
0 0 Map maps/City_Zones/City_04_01/City_04_01.txt
The one exception to this is for a demo made in a Supergroup Base. Demos recorded in bases will not have any file name specified after the Map command. The Map command will end the line and will be followed by the Base command on the next line.
A list of known maps can be found at the City of Heroes Codex.
Base
A Supergroup Base does not have any pre-defined map associated with it. This is reflected in recorded demos by the Base command. Demos recorded in a base will not have any map file name specified after the Map command, but the next line of the demo file will include the Base command, which will precede a large amount of data apparently used to define and generate the base layout. For example (note that the binary Base data is incomplete in this example and would typically continue to fill a page or more):
0 0 Map 0 0 Base "UÀ�\0x^íYsÛ¸–€ç5©Ê?`õ˼Ü8Ü\pùÍ–—¤oÜí±Ü[35¥‚)Äâ5Eª¸\dQ~ý�¸H¤D� \de...
The Base command appears only for demos recorded inside a Supergroup Base. Demos recorded in any other location, mission, or circumstance will not include the Base command.
Time
The Time command instructs the game engine what time of day to use for the demo playback. The value which follows the Time command on this line is the time of day, in hours, using the military time notation (also known as 24-hour clock notation), with fractions of an hour expressed as a decimal value. Hence values following the Time command may range from 0.0 to 23.99. In a demo, this line would appear as follows:
0 0 Time 14.428092
Where, in this example, the value of 14.428092 corresponds to 2:25 PM (and about 41 seconds). Some examples of Time values, with their equivalent 12-hour clock notation, are as follows:
| Demo Time Value | Equivalent 12-Hour Clock Time |
|---|---|
| 0.000 | 12:00 Midnight |
| 6.500 | 6:30 AM |
| 12.000 | 12:00 Noon |
| 16.667 | 4:40 PM |
| 22.000 | 10:00 PM |
Note that, unlike in-game, the time of day does not advance in demo playback, so whatever the time is as specified in the demo code is what the time of day will be for the entire demo playback.
POS
The POS command refers to "position." This is used to tell the game engine where to place a given entity in the demo playback. All players, NPC, and objects (all entities), as well as the demo camera (or CAM) must have a associated POS command in order to appear properly in the demo. Changing the POS values for an entity over the course of a demo controls the movement of that entity in the demo. Changing the POS is how you move something from point A to point B.
The POS command is followed by a set of three numerical map coordinates in X Y Z format (see also Coordinates).
0 1 POS -1140 102 4592.5
For a given map, the X value corresponds to its East-West position of the entity, the Y value corresponds to altitude or Up-Down position of the entity, and the Z value corresponds to the North-South position. Larger values of X are further to the West, larger values of Y increase altitude, and larger values of Z are further to the South. Note that, for X & Z, this may be the reverse of what is intuitive for many.
The values for POS are expressed in feet. So changing a Z value from 1.0 to 2.0 will move an entity one foot to the South. Changing a Z value from 1.0 to 2641.0 will move an entity a half mile to the South.
The appearance of CAM POS in the code is worth special note. As discussed above, CAM is used as the Entity ID for the demo camera -- the POV from which the demo is recorded. The camera, or CAM, is a special pre-defined demo entity which uses the text CAM as its Entity ID rather than an integer value like most entities. With regards to its use of the POS command, the CAM POS lines function the same as for any other entity in that they determine the position and movement (through changing the position) of the demo camera/demo POV.
PYR
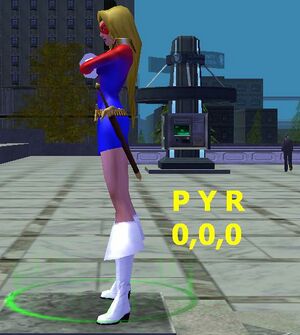
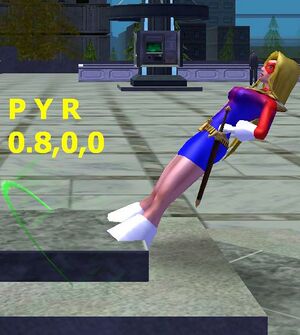
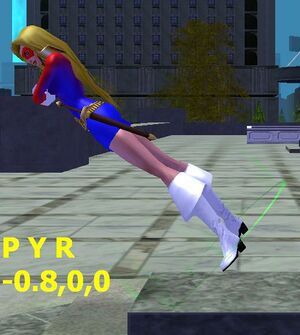
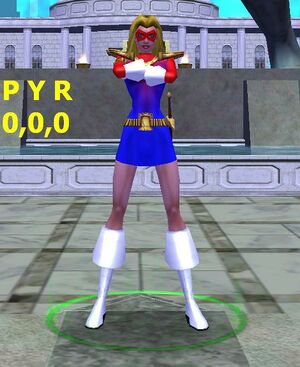
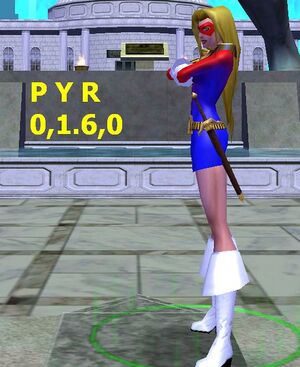
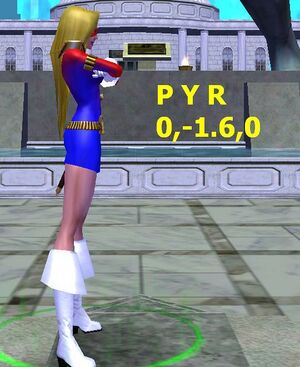
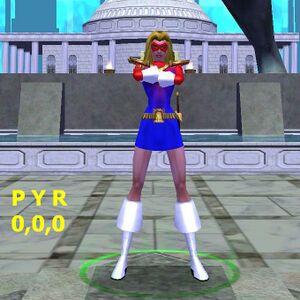
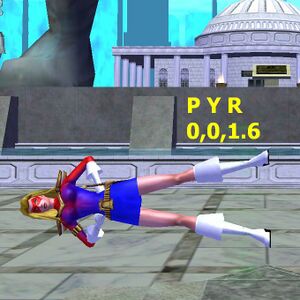
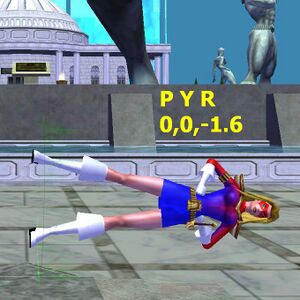
The PYR command stands for "Pitch-Yaw-Roll". PYR is used similarly to the POS command. Where POS is used to specify the position of an entity, PYR specifies the spacial orientation of an entity. Put another way, POS determines where on the map Ms. Liberty shows up, and PYR determines whether she is standing on her head or on her feet.
The PYR command is followed by three numerical values for Pitch, Yaw, and Roll. These values are expressed in radians, with values ranging from -3.14159 to 3.14159 (-pi to +pi). A total of 2pi (6.28319) represents a complete rotation of 360 degrees for any of the three axes.
0 1 PYR 0 2.626175 0
The Pitch (or "P") value determines the front-to-back tilt of an NPC, object, or other entity -- whether an entity is leaning to the front or to the back.
The Yaw (or "Y") value determines the left-right facing of an NPC, object, or other entity -- whether an entity is facing to the right or left, rotating around its vertical axis.
The Roll (or "R") value determines the side-to-side tilt of an NPC, object, or other entity -- whether an entity is leaning/rotated to the left or to the right.
Note that the axis of rotation for most models is at the base of the model and not through their apparent center.
The combination of these three values allows you to adjust an entity in all three dimensions to obtain any orientation desired.
All of the additional comments made regarding CAM POS also apply for CAM PYR (relative to the PYR) command, where CAM PYR is a PYR command applied to the CAM (camera) Entity ID.
NEW
NEW is the command used by the demo to tell the game engine that it is adding a new entity (NPC, player, object, mission objective, etc.). The line with the NEW command is (with one exception) where the unique Entity ID is first specified (the second numerical value in the line, after the Time Increment) and is the most important value associated with the NEW command. When you use the NEW command to add a new entity, that entity and anything associated with it must use the same Entity ID throughout the demo thereafter. For example, in the following line of demo code, "37" is the Entity ID which must be associated with Ms. Liberty and all commands attached to the Ms. Liberty entity for the remainder of the demo.
0 37 NEW "Ms. Liberty"
The NEW command is followed by the name to be attached to that entity. This can be left blank. The entity does not require that a name be attached. If the name is one word, with no spaces, then quotes are not required for the name:
0 26 NEW Statesman
If the name includes spaces (more than one word), then the name must be enclosed by quotation marks:
0 14 NEW "Sister Psyche"
You may enclose single-word names in quotation marks and this will not cause any harm, although recorded demos do not use this convention:
0 26 NEW "Statesman"
NPC, model, and mission objective names do not display during demo playback, but player character names do display. If you do not want player names to appear over their heads during demo playback,one way to do this is via demo editing by leaving the name field blank:
0 26 NEW
Or by entering a blank space between quotation marks for a name:
0 26 NEW " "
The NEW command can be used mid-way through a demo to add an entity that was not there at the start of the demo.
NPC
The NPC command specifies the game model to display for an NPC. Remember that the Entity ID for the NPC line must match the unique Entity ID assigned by the NEW command. For example:
0   14  NEW "Chief Mentalist"
0   14  NPC Rikti_Armour_Lieutenant_01
Entities classed as an NPC include all "normal" non-player characters (enemies, allies, monsters, etc.), but also all destructible objects. Any object in a mission or map which can be destroyed (such as mailboxes, fire hydrants, and everything else in Mayhem Missions) is considered an NPC and its appearance is managed by the NPC command and the model assigned thereby.
See Demo Model Names for a list of known Models or a potentially more complete list can be found at the City of Heroes Codex.
MOV
The MOV command determines the animation performed by an entity. The animation named after the MOV command is executed by the entity as specified by the unique Entity ID on the MOV line. For example, the following MOV command will cause the entity with the unique Entity ID of "10" to perform the "bow down" emote:
0 10 MOV EMOTE_BOW_DOWN 0
The number at the end of the line is a feature added to demos with Issue 12. A "0" (zero) is the default or null value and executes the animation unmodified. Other positive integer values, besides zero, relate the animation to a weapon or object attached to the entity.
A list of known MOVs can be found here.
HP
The HP code specifies the current Health of a destructible NPC. This code is associated only with NPCs which can be damaged or destroyed. NPCs or other entities which can not be damaged do not use this code. Hence, the HP code will not be seen in a demo file for such NPCs as pedestrians, trainers, contacts, or stores; but will be seen attached to enemies and destructible objects.
Any NPC which uses the HP code must also have the HPMAX code associated to it. HP specifies the current Health and HPMAX specifies the maximum Health. Both codes must be associated with any destructible NPC. For example:
0   5   NEW "Blood Brother Slammer"
0   5   NPC Thug_Hellion_01
0   5   POS -227.15625 0 130.203125
0   5   PYR 0 -0.380427 -0
0   5   MOV LOITER_READYC 0
0   5   HP 60.00
0   5   HPMAX 60.00
For NPC characters (enemy/ally types), this code is not normally required when simply making such an entity appear in a demo. However, this is vital for properly displaying destructible objects. Many destructible objects have a variable appearance which is based on the relative values of HP and HPMAX. If these lines are not included in the demo for such NPCs, the game engine will render the destructible objects as if they had zero HP; which typically (though not always) means that the object will be treated as destroyed and will not be visible in the demo playback.
The values of HP for an NPC will change over the course of a demo recording as that NPC is damaged or healed.
If you are adding an NPC or object to a demo, and are uncertain whether it is destructible and requires the HP/HPMAX code, it is harmless to add this code to an NPC, even if it is not required.
HPMAX
HPMAX specifies the maximum Health of an NPC. As mentioned above under the HP detail, this command is attached to destructible NPCs and objects, which must also have the HP code attached.
For destructible objects which have a variable appearance, the relative proportion of the values for HP and HPMAX determines the appearance of those destructible objects in the demo playback.
DEL
Just as the NEW command is used to add an entity to a demo, entities can also be removed from a demo via the DEL command. This command will delete the specified entity, removing them from the demo.
This command is not accompanied by any variables after the command, requiring only the Time Increment (as all lines do) and the Entity ID, which is the ID of the entity to be deleted from the demo.
0 70 DEL
Player
The Player command is used to specify the particular player character around which the demo is being recorded. It is used just to flag that one specific player character, and only that one character should have the Player command attached to it. Other player characters that appear in the demo, that are not the POV character of the demo recording, do not have this flag attached.
This command is an exception to the usual convention for the NEW command in that the Player command is issued first and is when the unique Entity ID is attached to the POV player character (immediately before the NEW line), appearing like so:
0   48  Player
0   48  NEW "Lady Briton"
The Player command has no associated trailing values or variables.
COSTUME
The COSTUME command is required for every player character in a demo. The COSTUME line includes the variables used to specify the body type, build, and facial dimensions of a character. It is followed, on subsequent lines, by the PARTSNAME code which specifies the remainder of the player character costume. The following shows a single line of demo code reflecting the number of variables used by the COSTUME command:
0 1026 COSTUME 0 aad2f6 2.802201 -0.269841 -0.015873 -0.015873 -0.301587 -0.238095 -0.015873
-0.015873 -0.015873 -0.015873 -0.015873 -0.015873 -0.015873 -0.015873 -0.015873 -0.015873 -0.015873
-0.015873 -0.015873 -0.015873 -0.015873 -0.015873 -0.015873 -0.015873 -0.015873 -0.015873 -0.015873
-0.015873 -0.015873 -0.015873
PARTSNAME
The COSTUME line is followed immediately by (currently) 27 lines of the PARTSNAME code used to specify the costume parts and colors of a player character's complete costume. The PARTSNAME code includes specifying features such as Auras and Custom Weapons. Essentially all things associated with a player character's costume or standard appearance are controlled by the COSTUME and PARTSNAME code.
0   48  COSTUME 1 89a0ea 0.000000 0.000000 0.000000 -0.118681 -0.006593 -0.102857 -0.253846
0.014769 0.000000 0.000000 0.000000 0.000000 0.000000 0.000000 0.000000 0.000000 0.000000
0.000000 0.000000 0.000000 0.000000 0.000000 0.000000 0.000000 0.000000 0.000000 0.000000
0.000000 0.000000 0.000000
0   48  PARTSNAME Tight tights !Hips_V_Pattern_Strips_01 0000d4 990002
0   48  PARTSNAME Tight tights !chest_Fat_Stripe 0000d4 990002
0   48  PARTSNAME V_fem_Head.GEO/GEO_Head_V_Asym_Standard !Face_Skin_V_Fem_Head_19 !Face_V_Mask_Executioner_01 0000d4 ffffff
0   48  PARTSNAME Flare smooth_matte !glove_Sharp 0000d4 ffffff
0   48  PARTSNAME Smooth tights !Boot_V_Pattern_Stripe_01 0000d4 990002
0   48  PARTSNAME none none none ffffff ffffff
0   48  PARTSNAME Student_01 Long_01a Long_01b 00fdff 1c67ff
0   48  PARTSNAME none none none 00000000 00000000
0   48  PARTSNAME none none none 00000000 00000000
0   48  PARTSNAME Tight base Lion_01 00fdff 00cacc
0   48  PARTSNAME Smooth spiked_01a spiked_01b 0000d4 ffffff
0   48  PARTSNAME none none none 00000000 00000000
0   48  PARTSNAME none none none 00fdff 00fdff ffffff ffffff WEAPONS/Custom_Claws/Fem_ClawsRight_TalsorianBlade01.fx
0   48  PARTSNAME none none none 00000000 00000000
0   48  PARTSNAME none none none 00000000 00000000
0   48  PARTSNAME Half Cape_Top_01 none ffffff ffffff
0   48  PARTSNAME Half_31 Generic_01a Generic_01b 00fdff 3fbeff
0   48  PARTSNAME none Cape_01 none ffffff ffffff ffffff ffffff capes/CapeLongFem.fx
0   48  PARTSNAME none none none 00000000 00000000
0   48  PARTSNAME none none none 00000000 00000000
0   48  PARTSNAME none none none 00000000 00000000
0   48  PARTSNAME none none none 00000000 00000000
0   48  PARTSNAME none none none 00000000 00000000
0   48  PARTSNAME none none none 00000000 00000000
0   48  PARTSNAME none none none 00fdff 00fdff ffffff ffffff WEAPONS/Custom_Claws/Fem_ClawsLeft_TalsorianBlade01.fx
0   48  PARTSNAME none none none 00000000 00000000
0   48  PARTSNAME none none none 00000000 00000000
Note that the number of PARTSNAME command lines in a demo has changed over the history of the game as new costume piece groups have been added. Older demo files may have fewer lines.
XLU
The XLU command has, at various times, appeared in demo recordings; typically following either the costume data in the case of player characters or after the model information for NPCs. Whether this code is present in demo recordings or not has changed multiple times over the game's lifetime. At present, it is appearing attached to some, but not all, player character models after the final line of PARTSNAME code. A sample of an instance of the XLU command line:
0 2366 XLU 0.498039
The function of this command is unknown and modifying the variable attached to it does not affect the demo in any apparent way. It is possible that this is simply a code artifact which does not have any actual bearing on demo playback.
SEQ
Just as the NPC command is used to specify the model (and thereby appearance) of an NPC, the SEQ command is used to specify the model of a non-destructible, clickable object. SEQ is attached specifically to the type of entity used for non-destructible, clickable mission objectives ("clickies" or "glowies"). These particular types of entities are distinct from NPCs, with a different set of model codes.
However, these SEQ entities do not currently appear during demo playback (and this has been the case since demos were first introduced). SEQ objects are invisible when the demo is played back and do not show up.
Additionally, please note that the SEQ entities use a different set of model names specific to the SEQ command. This means that you can not simply replace the SEQ command with the NPC command, keeping the original SEQ model name, to make these objects appear during demo playback. Swapping the commands in this way would only work if you also changed the model name to use an NPC model equivalent to the SEQ model (most do appear to have equivalent NPC models, however).
FX
The FX command is used to specify the creation in demos of the "effects" used by the game; namely, the powers, the explosions, and essentially any visual effect that is not otherwise produced by an entity's model or by an animation (MOV).
The FX command line includes a fair amount of data. Here is a sample line:
0 3 FX OneShot 4 POWERS/FIRECONTROL/FIREPHOENIX.FX 0
A detailed breakdown of this line is as follows:
- 0: The first number of the line is, as always the Time Increment.
- 3: The second number in the line is, as usual, the Entity ID. This specifies the unique ID of the entity which "owns" this effect.
- FX: The FX demo command itself, specifying that this line is executing an effects command.
- OneShot: After the FX, a demo also specifies the duration type of the FX. There are two possible values which may be used here -- OneShot or Maintained. OneShot defines this FX as a one-time event that lasts just as long as it takes the particular FX to execute. Maintained identifies an ongoing FX which will continue until the demo ends, the entity it is attached to is removed from the demo, or an FX termination command is given.
- 4: The number after the duration type is a unique ID number assigned to this specific FX. Much like demos must include a unique Entity ID for every NPC, player character, or object used in the demo, every FX is assigned a unique FX ID to identify it. This value is always a positive integer and must be unique for any particular FX. The other command which utilizes this ID number is the FXDESTROY command used to end or delete a visual effect.
- POWERS/FIRECONTROL/FIREPHOENIX.FX: This is the demo code of the particular FX which the game engine is instructed to execute. (In this particular case, this is the demo code for the Rise of the Phoenix power.)
- 0: After the demo code of the FX to be used, the line ends with a number. This is most often a 0 but may contain the Entity of an associated FX, for instance:
0 1590 FX OneShot 468654 POWERS/SONICCONTROL/BLASTS/HEROSMALLBLAST.FX 0
Would be followed by
0 1591 FX OneShot 468655 POWERS/SONICCONTROL/BLASTS/STANDARDBLASTHIT.FX 468654
This represents the core demo code line for specifying a power or other FX-based visual effect. This initial command line is generally followed by three related lines associated with the visual effect. The lines which typically follow are the FXSCALE, ORIGIN, and TARGET command lines.
A list of known FX can be found at the City of Heroes Codex.
FXSCALE
The FXSCALE code is a standard effects-related command which always follows the main FX line. This command is always expressed with a standard set of variables as "FXSCALE 10.000000 10". For example:
0 3 FXSCALE 10.000000 10
Modifying these variables does not appear to produce any change in demo playback or in the scale or appearance of the relevant visual effects.
ORIGIN
The third required demo command for visual effects is the "ORIGIN" command. This command is used to identify the source of an FX, doing so via the Entity ID which precedes the command:
0 3 ORIGIN ENT 0 0
The values following the ORIGIN command (ENT to specify an entity and the numerical values) appear to always be constant, with "ENT 0 0" being the only values to follow the ORIGIN command.
TARGET
The TARGET demo command line is the final line required for managing visual effects. This command line specifies that target or subject of a particular FX. There are, in general, three different cases which may be specified by the TARGET command.
For the first case, the TARGET command line specifies an FX which is self-targeted, where the entity which is causing or "owns" the FX is targeting themselves or otherwise applying that FX to themselves. This is the case for many damage shields, protection toggles, self-heals, and so forth where an entity uses a power that creates a visual effect on their self. In this case, the TARGET command will be followed by the ENT value, to specify that the target subject is an entity and then by Entity ID of the target subject. Because the entity is self-targeting, the Entity ID before and after the TARGET command will be the same:
0 3 TARGET ENT 3 0
In the second case, the TARGET command is used in a situation where one entity is using an FX on or against another entity. This generally the situation which occurs when one entity shoots at another with an energy bolt or fire blast, but also applies to any circumstance where one entity is generating the FX and another, different entity is the recipient of the FX. In this situation, the TARGET command will be precede by the Entity ID of the entity creating or generating the FX and the Entity ID after the TARGET command (and ENT value for entity) will be the unique ID of the different entity which is the target recipient of the FX being generated:
0 3 TARGET ENT 27 0
In the third case, the TARGET command is also applied for powers and effects where the target of the FX is not an entity, but is instead a targeted location or position. This is the case where the power effect being created is a Targeted AoE power. For this application, the TARGET command is not followed by ENT (since the target is not an entity), but is instead followed by the POS identifier to flag it as a position being targeted, and then this is followed by the standard POS coordinates of the specific location being targeted:
0 3 TARGET POS 1678.937500 -448.846710 193.356308
In the first two cases, the end of line value appears to always be a "0" zero, for the TARGET command line.
FXDESTROY
A Maintained FX continues indefinitely. In order to stop a Maintained FX, the FXDESTROY command must be issued. The FXDESTROY command tells the game engine to terminate an ongoing FX. The number which follows the FXDESTROY command is the FX ID attached to the effect in the FX command line. In the following example, the FX being ended is the one with the FX ID of "4" ("3" being the Entity ID of the entity which "owns" the FX):
0 3 FXDESTROY 4
SKY
Currently, the SKY command appears to serve two purposes.
First, the SKY command line is used as a "generic" time advancer for demo playback. If there is no other action taking place (no other demo commands being issued), a demo recording will use the SKY command (maintaining its current variables) to advance the Time Increment. If you have a demo recording where nothing is currently happening or changing, other than that time is progressing, the SKY command line will generally be used to advance the time in the demo file. When looking at a demo file, especially one with a significant amount of "idle" activity, you will frequently see SKY command lines with a non-zero Time Increment:
420 SKYFILE SKY 1 0 1.000000
Second, the SKY command is also used to control the color change of the sky during an invasion event, such as the Rikti World Invasion or the Zombie Apocalypse. This is done by changing the integer values of the first two variables following the SKY command:
| Sky "Type" | Demo Code | Color |
|---|---|---|
| Normal/Default Sky | 0 SKYFILE SKY 1 0 1.000000 | map default (usually Blue) |
| Normal/Default Sky (alternate) | 0 SKYFILE SKY 2 0 1.000000 | map default (usually Blue) |
| Rikti Invasion Sky | 0 SKYFILE SKY 0 1 1.000000 | Olive Green |
| Zombie Apocalypse Sky | 0 SKYFILE SKY 0 2 1.000000 | Dark Red |
The intended function of the final variable following the SKY command is unclear. Increasing this value will cause color to start washing out all detail, with varying depth and intensity. It may possibly represent a saturation value or a depth of field value. In all known demo recordings, this entry always maintains a constant value of 1.000000.
DYNARRAY
The DYNARRAY command is used to control dynamic map content in a demo recording. This command will be followed by an array of data that instructs the game engine how to display the dynamic map content during demo playback. Not all maps have dynamic content attached to them, and demo recordings on maps that lack dynamic content will not include this command. Dynamic content in this respect referes to map elements (as opposed to entities) that may change or vary in appearance. Examples of such content include the War Walls (which are raised and lowered by the Rikti invasions), the Atlas Park & Grandville "war boards" or "status boards" (which display the current control/ownership status of the pillboxes in Recluse's Victory), and the variable map appearance of Recluse's Victory itself.
The size of the array which follows the DYNARRAY command will vary depending on the number of dynamic elements which must be managed for that map. Many city zones will have only a single array set for managing the display state of the War Walls. For example:
0 DYNGROUPS DYNARRAY |100,0
Other zones, such as Atlas Park and Grandville, will have additional or other array data to manage their dynamic content, including the Recluse's Victory status boards. For example:
0 DYNGROUPS DYNARRAY |100,0|100,0|100,0|100,0|50,0|100,0|50,0|50,0
Some city zones will not have any DYNARRAY command associated with them if they lack traditional War Walls or other dynamic content.
Chat
The Chat command line specifies the NPC and player dialogue (and emotes) contained in a demo file. A typical Chat command line appears as follows:
0 26 Chat 4 0 "Button Man Gunner: Who's this mook? Attack!"
The first variable after the Chat command specifies on which chat channel the subsequent dialogue takes place (Local, Broadcast, Request, etc.), designated by an integer value associated with each chat channel. After the chat channel value, the next number appears to currently only hold a value of "0" (zero). Previously, this place held other values which may have been intended to control the visibility of the chat during demo playback. The chat-related demo code which previously used this appears to have been discontinued with Issue 12, possibly due to previous demo problems with chat capturing and/or playing back correctly. Following this value is, enclosed by quotes, the name of the entity speaking the dialogue and the dialogue itself.
Chat command lines may also include text formating detail, if present, for such features as player text using customized colors. For example:
0 2088 Chat 10 0 "Sungrazer: <color #ff0101><bgcolor #ffff01>Greetings, citizen!"
Known chat channels, including previously captured elements, their associated Chat command values, and their current state of capture by demo recordings is as follows:
| Chat Channel Value | Corresponding Chat Channel | Currently Captured (I12+) |
|---|---|---|
| 1 | Damage Inflicted | No |
| 2 | Damage Received | No |
| 4 | NPC Chat | Yes |
| 7 | Tells | |
| 8 | Team Chat | Yes |
| 9 | Supergroup Chat | Yes |
| 10 | Local | Yes |
| 11 | Broadcast | Yes |
| 12 | Request | Yes |
| 17 | Emotes | Yes |
| 18 | Consignment House | No |
| 19 | General Combat | No |
| 22 | Rewards | No |
| 23 | Combat Warnings | No |
| 24 | Healing Received | No |
| 26 | Help | Yes |
float
The float command is associated with the "floating" messages which appear during game play when certain conditions occur. For example, the "Inspirations Full" and "Invention Salvage Found" messages which appear on screen are associated with the float command in a demo file. A sample float command line is as follows:
0 13 float 6 FloatFoundSalvage
Currently, the messages associated with the float command are not visible during demo playback.
floatdmg
Similar to the float command, the floatdmg command line is associated with the damage and healing values which appear above an entity's head during game play, along with certain other combat-related messages (such as the "CRITICAL" message associated with a Scrapper's successful Critical Hit). For example:
0   13  floatdmg 618 104 ""
0   13  floatdmg 618 104 ""
0   13  floatdmg 618 0 CRITICAL
EntRagdoll
The EntRagdoll command (likely meaning "Entity Ragdoll"), is used to provide detail in the demo file on the ragdoll physics effects associated with a particular entity. The EntRagdoll command is followed by a lengthy amount of data which is believed to provide the instructions for displaying the ragdoll physics effects as seen during demo playback.
For current player investigations into the format and detail of the variables and values associated with the EntRagdoll command, see this thread on the CoH official forums.
Note that, although the presentation of ragdoll physics in demo recordings has improved with recent Issues, its appearance during demo playback may still appear lacking compared to live game play.
DYNLIB
The DYNLIB command is specific to demos recorded in a Supergroup Base. Combined with specific model calls made with an NPC command line immediately preceding, the DYNLIB command manages the display of base objects in a demo recording. The use of the DYNLIB command will appear like so:
0   2   NEW "Basic Worktable"
0   2   NPC v_base_object_unselectable
0   2   DYNLIB Basewrkshp_tableLOW_f_N_P
When the NPC command line value specifies v_base_object_unselectable or v_base_object, the next line will be the DYNLIB command and its associated variable which specifies the base object to be displayed. This diverges from an object's display normally being controlled solely by the NPC command line and is a convention particular to base objects.
